Note: | Installation is similar for 32-bit and 64-bit versions of Crystal Ball products. Figures in this section show screens for 32-bit installation. |
 To install Crystal Ball products:
Log in to the computer that will run the Crystal Ball software.
Download the correct installation file, 32-bit or 64-bit, as recommended in System Requirements.
Click the file that you downloaded. The file uncompresses its compressed contents.
The CD or the folder where you unzipped a downloaded Crystal Ball installation file (the installation source folder) contains these files:
Crystal Ball Installation Guide.pdf—The Oracle Crystal Ball Installation and Licensing Guide in Adobe Acrobat .pdf format; if you need this file in .html format before installing Crystal Ball, you can download it from the Deployment page of the EPM Documentation Library on Oracle Technology Network. To display that page, see Checking the README File.
License Key Request Process.html—The Oracle Crystal Ball License Key Request Process, which describes how to obtain and activate a Crystal Ball license code for use after the initial time-limited trial license expires
README.htm—An overview document that introduces Crystal Ball, describes how to display the latest Crystal Ball README (release notes) file on Oracle Technology Network, and lists third party license and copyright information
A bit-specific setup executable file—The setup launcher for Crystal Ball
If the installation does not start automatically, double-click the setup executable file in the folder where the installation files are located.
Note:
If the installation fails or you see a warning message, there may be a 32-bit/64-bit incompatibility. See Software and Hardware 32- and 64-Bit Compatibility Issues.
If installation stops and a message about another Crystal Ball version is displayed, see Uninstalling Crystal Ball Manually and follow the instructions there. This message could be triggered by the previous installation of other Oracle products, such as the Predictive Planning feature of Oracle Hyperion Planning, and you need to uninstall Oracle Crystal Ball when you find it in the Add/Remove Programs or Programs and Features list.
Under some circumstances, you may see a message about repairing the Crystal Ball installation. This is expected behavior.
When requested, select a setup language. The default is English (United States) except in cases where the language selection in Regional and Language Options on the Control Panel corresponds to one of the other installable Crystal Ball language versions.
A message states that the installation .msi file is being extracted. This can take several minutes. When extraction is complete, the Crystal Ball installer launches (Figure 1, The Crystal Ball installation Welcome Dialog).
Note:
In rare cases, antivirus programs can slow down the installation and cause other unexpected results including the disappearance of installation dialogs or the display of dialogs with only the Cancel button available. In these cases, the installation is still active and should proceed as usual within 10 minutes.
In the installation wizard Welcome dialog, notice that any existing versions of Crystal Ball will be uninstalled and that Microsoft .NET Framework is required.
If you do not have a supported version of Microsoft .NET Framework, or if you are not sure, click Next. The installer will look for the required Microsoft .NET Framework components. If a required version of Microsoft .NET Framework is not installed, a dialog opens and enables you to access the Microsoft Web site to download it.
If you are prompted to uninstall a previous version of Crystal Ball, click Yes both to uninstall and to confirm the uninstallation.
If you are prompted to uninstall shared files, select No To All. When the uninstallation has successfully completed, click OK.
In the Customer Information dialog, enter your name and organization (such as company or school) and click Next.
In the Setup Type dialog, select either Complete (Typical)( or Custom setup.
Complete (Typical) installs the Crystal Ball product package plus HTML files of product documentation in the default installation folder.
Note:
Unless you are installing Crystal Ball in a language other than English, Oracle strongly recommends that you select Complete (Typical) and install to the default installation folder. If you are installing a 32-bit version of Crystal Ball on a 64-bit version of Microsoft Windows, the default installation folder is under C:\Program Files(x86).
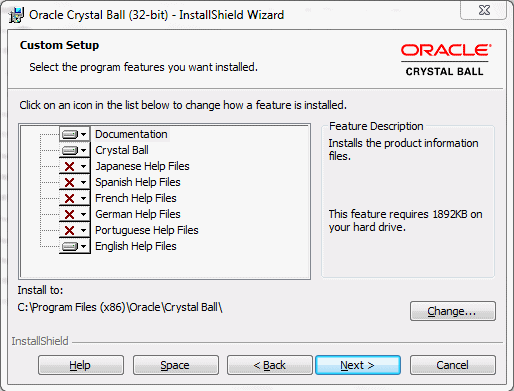
Custom enables you to select a different installation folder. You can also choose to install online help in languages other than the default (Figure 2, Customizing the Language of Crystal Ball Help). Click X to install an unselected language. Click
 to cancel installation of a selected language.
The language selected for Crystal Ball determines which help system is installed and displayed by default. If you select Custom to edit language installation, Oracle strongly recommends that you install to the default installation folder.
To change the language selection in the future, open Windows Control Panel, select Add/Remove Programs or Programs and Features, select Oracle Crystal Ball, and then select the modify or repair option. Follow the onscreen instructions and select a Custom installation. Then, add or remove languages by clicking their icons.
In the Ready to Install the Program dialog, review the settings you have selected, and then click Install.
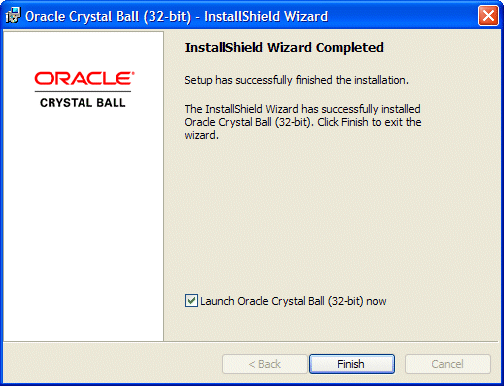
Figure 3, The InstallShield Wizard Completed Dialog shows the InstallShield Wizard Completed dialog. When it opens, click Finish.
Crystal Ball is ready to use.

You can use Crystal Ball for up to 15 days without a license. At that time, you must enter a username and serial number to continue. You can enter the username and serial number when you start Crystal Ball, or you can select a command from the Help menu or Help group in Microsoft Excel 2007 or later. See the following section, Licensing Crystal Ball.