When you click Next in the Decision Variables panel, the Constraints panel opens.
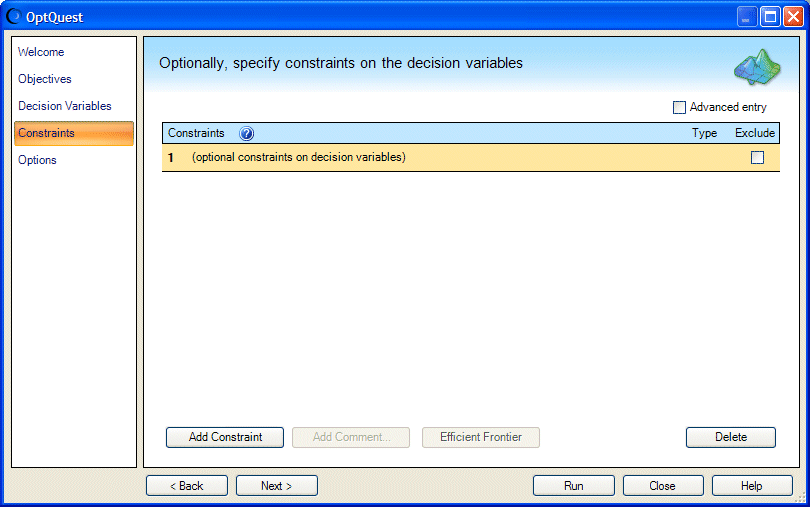
Optionally, use the Constraints panel to specify any restrictions that you can define with the decision variables. The constraint in this model limits the initial investment to $100,000.
By default, the Constraints panel opens in Simple Entry mode. In this mode, most of the constraint formula is entered into cells in your spreadsheet. You then complete the constraint formula on the Constraints panel using a simple conditional expression like Sheet!A1 <= 100.
For example, consider the constraint formula given previously as an example:
Money Market fund + Income fund + Growth and Income fund + Aggressive Growth fund = 100000
Each of the fund values is defined in Oracle Crystal Ball Decision Optimizer as a decision variable. In this example, these decision variables are defined in cells C13 through C16, as shown in Figure 25, Decision Variables Panel with Cell Locations, Portfolio Allocation Example.
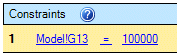
The left-hand side of the constraint formula shown previously is already entered into cell G13 of the Model worksheet of the Portfolio Allocation example:
 To enter the constraint into the Constraints panel:
A row with two edit boxes is displayed as shown in Figure 27, Constraints Editor in Simple Entry Mode, following.
In the first box, enter the cell that contains the left-hand side of the constraint formula, in this case, cell G13. You can type =G13 or you can use the cell selector to point to that cell. If the cell has a range name, you can use that instead of the cell address.
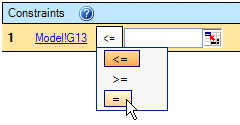
The default operator is <=. In this case, the formula calls for =. Click the underlined operator and select the one you want (Figure 28, Changing the Constraint Operator).
To enter the right-hand value for the equation, either type a number or reference a cell or range name that contains a value or formula. In Figure 29, A Constraint Entered in Simple Entry Mode, following, a number was entered, 100000.
At this point, you can do one of the following:
Click Run to run the optimization
For more information about adding comments and variable bounds, see Constraints Editor and Related Buttons.
As an alternative, you can enter the constraint formula directly, using Advanced Entry mode. For an example, see Specifying Constraints in Advanced Entry Mode.
When constraints settings are complete, click Next to continue.
The Options panel opens, similar to Figure 20, Options Panel, Futura with OptQuest Example.