OptQuest versions shipped with previous releases of Crystal Ball (prior to 11.1.1.x) stored optimization settings in .opt files. As described in Saving Optimization Models and Settings, this version of OptQuest saves settings in workbooks. An .opt file viewer is available to help you transfer settings from .opt files into this version.
 To use the .opt file viewer:
Open an optimization model created in a version of Crystal Ball earlier than 11.1.1. The model should have at least one forecast and one decision variable defined. They can be “dummy” data cells, and you can delete them later if you need to.
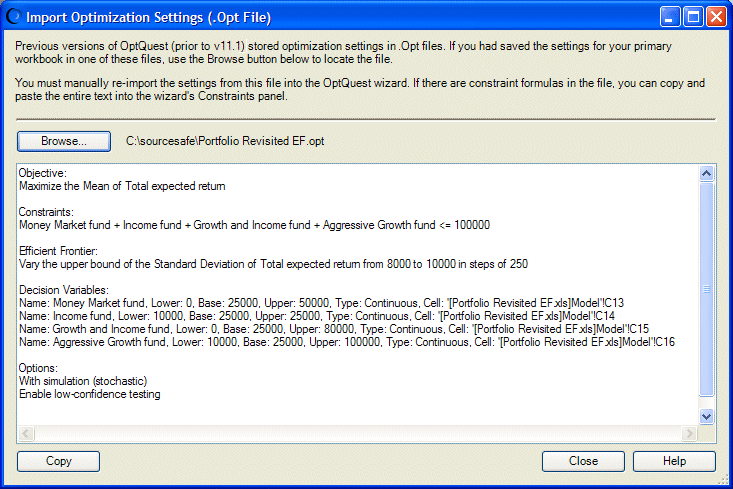
Click Browse to locate the .opt file. When you reach its folder, double-click the file. Its settings are displayed in the Import Optimization Settings dialog (Figure 14, Imported Settings for Portfolio Revisited EF.xls, following).
The objective and any requirements or constraints are displayed at the top. Decision variables and options are displayed at the bottom.
If the .opt file contains a variable requirement for Efficient Frontier analysis, it is displayed near the decision variables and is labeled “Efficient Fronter,” as shown in Figure 14, Imported Settings for Portfolio Revisited EF.xls, above.
The Options settings indicate whether the optimization is stochastic or deterministic and whether low-confidence testing is enabled to automatically stop the optimization when specified conditions are met.
Once you have imported the .opt file into the viewer, you can start transferring the information to each panel of the OptQuest wizard.
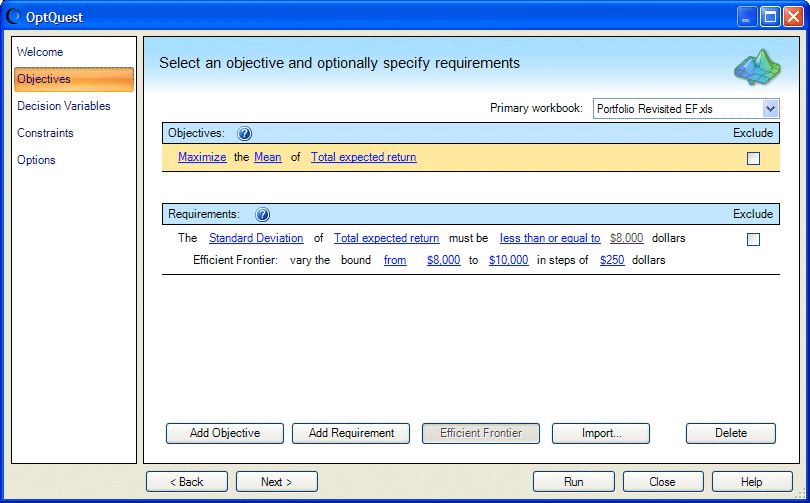
On the Objectives panel, add an objective and set it to match the text in the viewer.
If there are any requirements or variable requirements, add those and edit them to match the text. Figure 15, Objectives Panel, Portfolio Revisited EF.xls shows how to enter the objective and the requirement labeled Efficient Frontier in Figure 14, Imported Settings for Portfolio Revisited EF.xls.
Enter any constraints on the Constraints panel. You can select one or more constraint formulas in the viewer, click the Copy button, and then paste the constraint(s) into an empty constraint row using Ctrl+v. If you paste more than one constraint, each is automatically placed in a separate row.
If new decision variables are required, they must be added in Crystal Ball. If necessary, you can copy decision variables from the viewer into Notepad, print them, and then use the printout for a reference when creating the new ones.
When all the decision variables have been defined, start OptQuest again. Click the Decision Variables panel to confirm that all have been entered correctly.
Now you can run the optimization. All your new settings are stored in the workbook and will be saved permanently with the workbook the next time you save it.
You can store settings in additional workbooks and use them for a single model. For instructions, see “Maintaining Multiple Optimization Settings for a Model” in the OptQuest section of the Oracle Crystal Ball Reference and Examples Guide.
 .
.